---
URL: "/zh-CN/gallery/PowCap.html"
LLMS_URL: "/zh-CN/gallery/PowCap.md"
layout: "doc"
pageClass: "gallery-page-class"
title: "干掉图形验证码！基于PoW的Cap验证码集成指南"
---

---
layout: doc
pageClass: gallery-page-class
title: 干掉图形验证码！基于PoW的Cap验证码集成指南
---

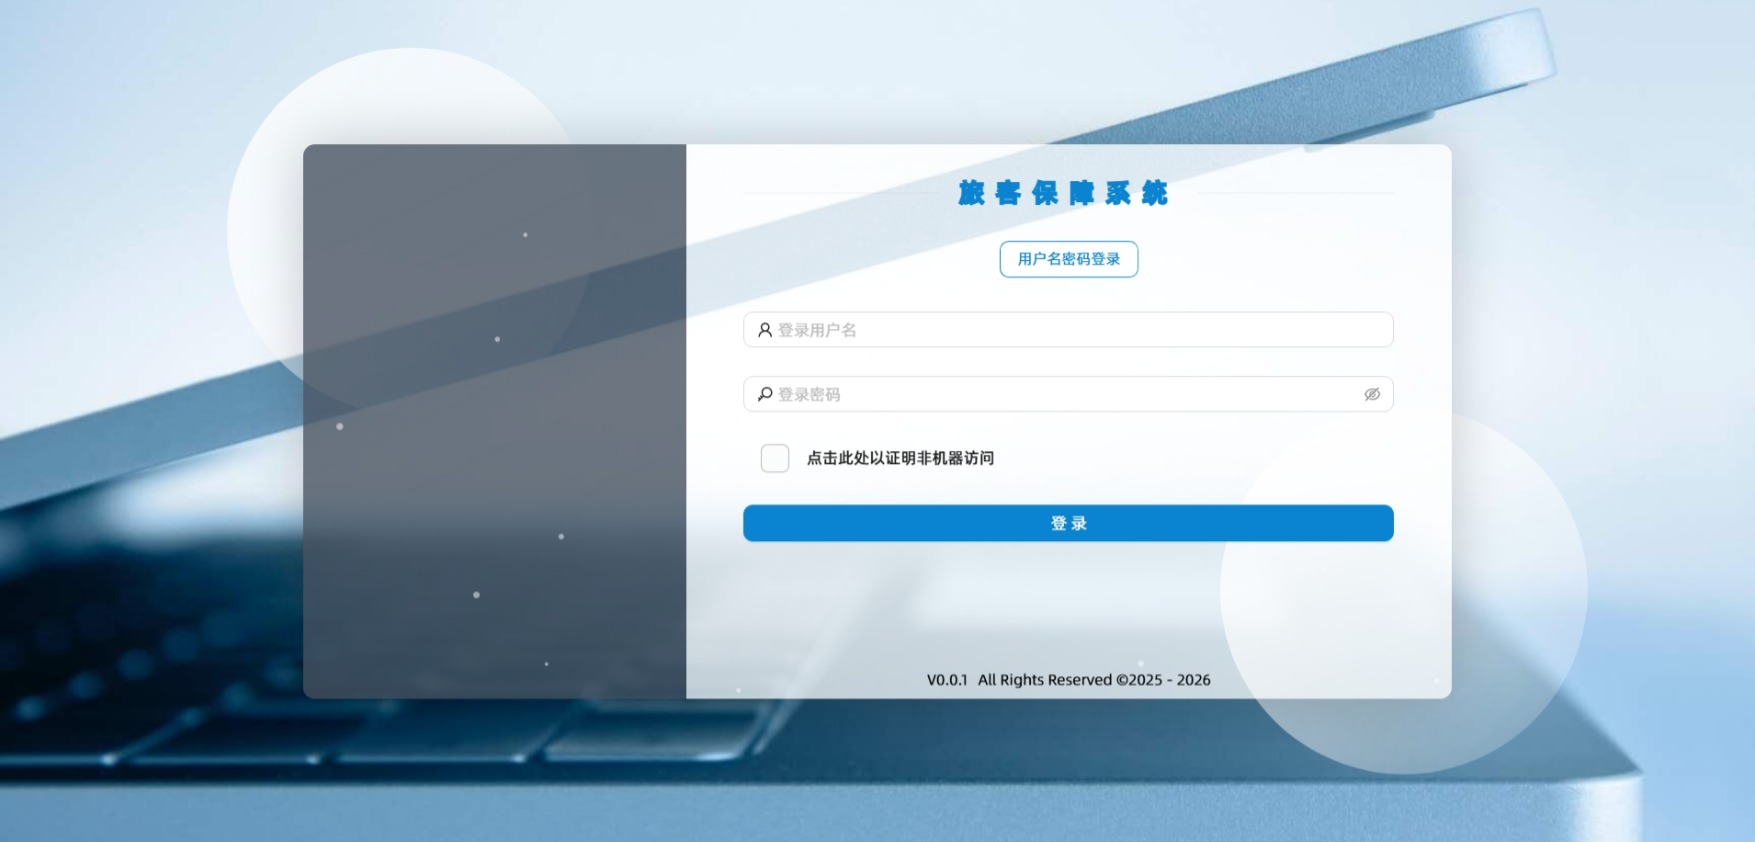
![点击前](/images/11-2-2026_132732_192.168.10.160.jpeg){data-zoomable}

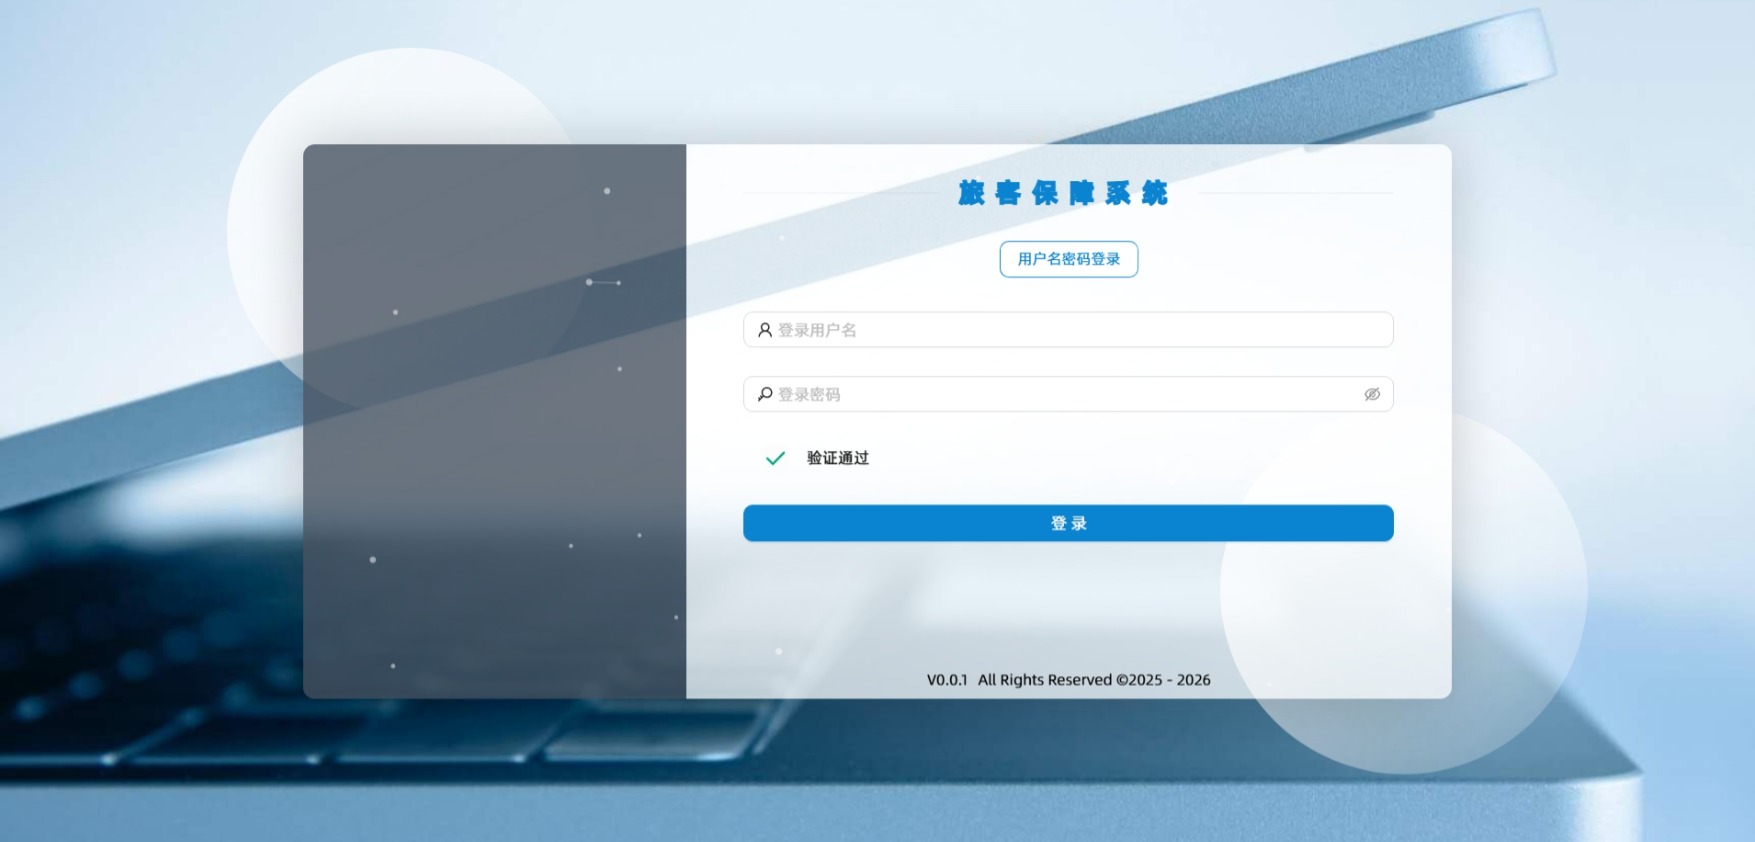
![点击后](/images/11-2-2026_13284_192.168.10.160.jpeg){data-zoomable}

## Cap 是什么 ##

> PoW 工作量证明（PoW，Proof of Work）

工作量证明（PoW）是一种加密任务，客户端必须解决该任务以验证其意图并获得对资源的访问权限。这种方法在诸如比特币这样的区块链中被广泛用于验证交易，但也可用于防止服务器过载。在我们的案例中，工作量证明要求客户端在访问服务器之前执行特定计算，从而形成一种“屏障”，使大规模自动化请求变得复杂。

工作量证明（PoW）过程的运作方式如下：服务端向客户端发送一项任务，该任务要求找到一个特定值（例如，具有一定数量前缀零的哈希值）。客户端解决该任务并将其解决方案发送回服务端。如果解决方案正确，服务端将接受该请求，否则就拒绝。

工作量证明（PoW）是一种要求客户端执行特定计算以证明其合法性的方法。PoW 的理念是服务端生成需要耗费计算资源的任务。客户端接收并解决该任务，然后服务端才会接受其请求。这种机制使得诸如分布式拒绝服务（DDoS）之类的攻击成本更高，因为攻击者要完成每个 PoW 任务需要耗费大量计算资源。
对于任何服务器而言，主要风险之一就是来自恶意客户端的大量请求，从而导致服务器过载甚至出现宕机情况。实际上，PoW 机制为每次请求设定了“报酬”，而“成本”就是客户端的处理时间。因此，PoW 会过滤掉一些请求，增加了完成这些请求所需的资源，从而减轻了服务器负载。
这也会迫使攻击者投入更多资源，从而使得这种攻击在大多数情况下都无法奏效。


> A modern, lightning-quick PoW captcha
> 一种现代的、闪电般快速的工作量证明验证码
> Cap is a lightweight, modern open-source CAPTCHA alternative using proof-of-work
> Cap 是一款轻量级、现代化的开源验证码替代方案，采用工作量证明机制。

与传统验证码不同，Cap：

- 速度快且不干扰用户
- 不使用跟踪技术或 cookie
- 使用工作量证明而非干扰性谜题
- 完全可访问且可自行托管

Cap 主要由小部件（可以以不可见的方式使用）和服务器（你也可以使用独立服务器）组成。另外，它还支持机器对机器通信，并且有一个类似于 Cloudflare 的检查点中间件。

## 客户端 ##

以在 Vue3 + ElementPlus 中使用为例

在 `index.html` 引入 Cap widget：

> 生产环境请引入固定版本

```javascript
<script src="https://cdn.jsdelivr.net/npm/@cap.js/widget"></script>
```

在 `ElForm` 中使用组件：

```html
<el-form-item prop="code">
  <cap-widget
    id="cap"
    :data-cap-api-endpoint="capApi"
    data-cap-i18n-verifying-label="验证中..."
    data-cap-i18n-initial-state="点击验证"
    data-cap-i18n-solved-label="验证通过"
    data-cap-i18n-error-label="验证失败，请重试"
  ></cap-widget>
</el-form-item>
```

其中 `data-cap-api-endpoint` 为服务端验证 URL 我这里设置为：

```typescript
const capApi = ref(`${import.meta.env.VITE_API_URL}/admin/sys/login/`);
```

`data-cap-i18n` 开头的几个选项为国际化设置。

设置表单，以及校验规则：

```typescript
import { type FormInstance, type FormRules } from "element-plus";

const formRef = ref<FormInstance>();

let formData = reactive<
  paths["/admin/sys/login"]["post"]["requestBody"]["content"]["application/json"]
>({
  username: "",
  password: "",
  code: "",
});

const rules = reactive<FormRules<typeof formData>>({
  username: [{ required: true, message: "请输入用户名" }],
  password: [{ required: true, message: "请输入密码" }],
  code: [{ required: true, message: "请点击验证" }],
});
```

监听 Cap 校验结果：

```tsx
onMounted(() => {
  const widget = document.querySelector("#cap");

  widget?.addEventListener("solve", function (e: any) {
    formData.code = e.detail.token;
  });
});
```

## 服务端 ##

以在 `Nestjs` 中使用为例

安装 `@cap.js/server`

```sh
npm i @cap.js/server // [!=npm auto]
```

在 Service 中创建 Cap 实例：

```typescript
import { InjectRepository } from "@nestjs/typeorm";
import Cap from "@cap.js/server";

@Injectable()
export class LoginService {
  // ...
  cap: Cap = new Cap({ tokens_store_path: ".data/tokensList.json" });
  //...
}
```

> Cap 默认使用内存和文件存储 token，你可以将 `noFSState` 设置为 `true`，仅使用内存存储 token。
> 你可以将此与设置 `config.state` 结合使用，以使用诸如 `Redis` 之类来存储令牌。
可以参考这个 [Pull requests](https://github.com/tiagozip/cap/pull/16)。

在 Controller 中创建接口：

```typescript
import { BadRequestException, Body, Controller, Post } from "@nestjs/common";
import { LoginService } from "./login.service";

@Controller("login")
export class LoginController {
  constructor(private readonly loginService: LoginService) {}

  @Post("/challenge")
  async challenge() {
    return this.loginService.cap.createChallenge();
  }

  @Post("/redeem")
  async redeem(
    @Body() body: { token: string; solutions: Array<[string, string, string]> }
  ) {
    const { token, solutions } = body;
    if (!token || !solutions) {
      return new BadRequestException("人机验证失败");
    }
    return this.loginService.cap.redeemChallenge({ token, solutions });
  }
}
```

当用户点击客户端 Cap 组件时，将请求 `/challenge` 和 `/redeem` 获取 token。

最后在登录接口的 Service 内添加 token 验证：

```typescript
// ...
const result = await this.cap.validateToken(loginDto.code);
if (!result.success) {
  throw new BadRequestException("人机验证失败");
}
// ...
```

## What is PowCapServer ##

This is a .NET Core server implementation of the open-source project tiagozip/cap. based on the Proof-of-Work (PoW) mechanism. It provides a lightweight and non-intrusive CAPTCHA solution that can be used to prevent bot abuse and spam submissions.

## 📦 NuGet Packages ##

The project is split into two main libraries, which will be published to NuGet:

- `PowCapServer.Core` – Core logic and services for CAPTCHA generation and validation.
- `PowCapServer.AspNetCore` – ASP.NET Core integration for exposing CAPTCHA endpoints as HTTP APIs.

You can install them via:

```bash
dotnet add package PowCapServer.Core
dotnet add package PowCapServer.AspNetCore
```

## 🧩 Features ##

- ✅ Challenge generation (`/api/captcha/challenge` or `/api/captcha/{useCase}/challenge`)
- ✅ Challenge redemption (`/api/captcha/redeem` or `/api/captcha/{useCase}/redeem`)
- ✅ Token-based CAPTCHA validation
- ✅ Configurable difficulty, expiration times, and endpoint paths
- ✅ Built-in token cleanup for expired challenges
- ✅ ASP.NET Core middleware and endpoint integration

## 🛠️ Usage ##

Install the NuGet packages

```bash
dotnet add package PowCapServer.AspNetCore
```

Register services

```cs
builder.Services.AddPowCapServer(options =>
{
    // Default configuration for CAPTCHAs without specific use case
    options.Default.ChallengeCount = 1000;
    options.Default.ChallengeSize = 32;
    options.Default.ChallengeDifficulty = 4;
    options.Default.ChallengeTokenExpiresMs = 60000;
    options.Default.CaptchaTokenExpiresMs = 120000;

    // Configuration for specific use case CAPTCHA
    options.UseCaseConfigs = new Dictionary<string, PowCapConfig>()
    {
        ["login"] = new PowCapConfig
        {
            ChallengeCount = 1000,
            ChallengeSize = 32,
            ChallengeDifficulty = 5,
            ChallengeTokenExpiresMs = 60000,
            CaptchaTokenExpiresMs = 120000
        },
        ["form"] = new PowCapConfig
        {
            ChallengeCount = 100,
            ChallengeSize = 16,
            ChallengeDifficulty = 3,
            ChallengeTokenExpiresMs = 120000,
            CaptchaTokenExpiresMs = 600000
        }
    };
});
```

Map CAPTCHA endpoints

```cs
app.MapPowCapServer();
```

This will expose the following endpoints:

- POST `/api/captcha/challenge` – Generate a new CAPTCHA challenge with default configuration.
- POST `/api/captcha/{useCase}/challenge` – Generate a new CAPTCHA challenge with configuration specific to the use case.
- POST `/api/captcha/redeem` – Redeem a solved CAPTCHA challenge with default configuration.
- POST `/api/captcha/{useCase}/redeem` – Redeem a solved CAPTCHA challenge with configuration specific to the use case.

## 🗃️ Storage and Caching ##

By default, PowCapServer uses the `Microsoft.Extensions.Caching.Memory` implementation of `IDistributedCache` to store CAPTCHA-related data in memory. This provides a lightweight, in-memory storage solution that's perfect for single-instance deployments.

For more robust scenarios such as multi-instance deployments or when persistence is required, you can replace the default in-memory cache with other `IDistributedCache` implementations. 

Popular alternatives include:

- Redis Distributed Cache
- SQL Server Distributed Cache

To use Redis as an example, first install the required package:

```bash
dotnet add package Microsoft.Extensions.Caching.StackExchangeRedis
```

Then configure it in your service registration:

```cs
builder.Services.AddPowCapServer();
builder.Services.AddStackExchangeRedisCache(options =>
{
    options.Configuration = "localhost:6379"; // Redis server configuration
    options.InstanceName = "PowCapServer:";
});
```

For more information on available IDistributedCache implementations, please refer to the Microsoft Documentation.

## 📐 Integration with Frontend ##

please refer to the official documentation of `@cap.js/widget` for instructions on how to embed and configure the CAPTCHA widget in your web application.

Example for default CAPTCHA:

```html
<script src="https://cdn.jsdelivr.net/npm/@cap.js/widget"></script>

<cap-widget id="cap" data-cap-api-endpoint="/api/captcha/"></cap-widget>
```

Example for specific use case CAPTCHA (e.g. login):

```html
<script src="https://cdn.jsdelivr.net/npm/@cap.js/widget"></script>

<cap-widget id="cap" data-cap-api-endpoint="/api/captcha/login/"></cap-widget>
```

```vue
<template>
  <a-spin :spinning="spinning" class="login-form-body-spin" tip="登录中...">
    <a-form scrolltofirsterror hiderequiredmark :layout="'vertical'">
      <a-form-item name="username" :validateFirst="true" v-bind="validateInfos.username">
        <a-input
          autocomplete="off"
          has-feedback
          v-model:value="modelRef.username"
          placeholder="登录用户名"
        >
          <template #prefix>
            <user-outlined />
          </template>
          <template #addonAfter> </template>
        </a-input>
      </a-form-item>

      <a-form-item has-feedback name="password" v-bind="validateInfos.password">
        <a-input-password
          autocomplete="off"
          v-model:value="modelRef.password"
          @paste.capture.prevent="false"
          placeholder="登录密码"
        >
          <template #prefix>
            <key-outlined />
          </template>
        </a-input-password>
      </a-form-item>

      <a-form-item has-feedback name="captchaCode" v-bind="validateInfos.captchaCode">
        <a-input v-model:value="modelRef.captchaCode">
          <template #addonAfter>
            <captcha-code :client-id="modelRef.clientId" />
          </template>
          <template #prefix>
            <safety-outlined />
          </template>
        </a-input>
      </a-form-item>

      <a-form-item has-feedback name="captchaCode" v-bind="validateInfos.captchaCode">
        <a-input v-model:value="modelRef.captchaCode">
          <template #addonAfter>
            <cap-widget
              ref="cap"
              onsolve="console.log(`Token: ${event.detail.token}`)"
              :data-cap-api-endpoint="capApi"
              data-cap-i18n-verifying-label="验证中..."
              data-cap-i18n-initial-state="点击验证"
              data-cap-i18n-solved-label="验证通过"
              data-cap-i18n-error-label="验证失败，请重试"
            ></cap-widget>
          </template>
          <template #prefix>
            <safety-outlined />
          </template>
        </a-input>
      </a-form-item>

      <a-form-item>
        <a-space style="width: 100%" direction="vertical">
          <a-button type="primary" block @click="onSubmit">登录</a-button>
        </a-space>
      </a-form-item>
    </a-form>
  </a-spin>
</template>

<script setup lang="ts">
import { useForm } from 'ant-design-vue/lib/form'
import { JSEncrypt } from 'jsencrypt'
import { v4 as uuidv4 } from 'uuid'
import { onMounted, reactive, ref, toRaw, useTemplateRef } from 'vue'
import { useRoute, useRouter } from 'vue-router'
import useHotkey, { type HotKey } from 'vue3-hotkey'

import { jwtAuth } from '@/apis/authentication/account.api'
import { defaultHomePath } from '@/router'
import { useAuthStore } from '@/stores/auth.store'
import type { ValidateErrorEntity } from 'ant-design-vue/es/form/interface'

const hotkeys = ref<HotKey[]>([
  {
    keys: ['enter'],
    preventDefault: true,
    handler(keys) {
      console.log(keys)
      onSubmit()
    },
  },
])
useHotkey(hotkeys.value)

const capApi = ref(`http://localhost:5075/api/captcha/form`)

interface LoginFormState {
  username: string
  password: string
  captchaCode: string
  clientId: string
}

const modelRef = reactive({
  username: '',
  password: '',
  captchaCode: '',
  clientId: uuidv4(),
})
const spinning = ref<boolean>(false)

const rulesRef = reactive({
  username: [
    {
      required: true,
      trigger: ['blur', 'change'],
      message: '请输入登录用户名',
    },
  ],
  password: [
    {
      required: true,
      message: '请输入登录密码',
      trigger: ['blur', 'change'],
    },
  ],
})

const { validate, validateInfos } = useForm(modelRef, rulesRef)

const router = useRouter()
const route = useRoute()

const captchaRef = ref()

const onReady = (handle: any) => {
  console.log('Captcha is ready', handle)
}

const onError = (error: any) => {
  console.error('Captcha error:', error)
}

const capRef = useTemplateRef('cap')

onMounted(() => {
  console.log('cap', capRef.value)
  capRef.value.addEventListener('solve', function (e: any) {
    const token = e.detail.token
    console.log('solve token', token)
    // handle the token as needed
  })
  capRef.value.addEventListener('error', (e: any) => console.error('Cap错误:', e.detail))
  capRef.value.addEventListener('progress', (e: any) => console.log('Cap progress:', e.detail))
  capRef.value.addEventListener('reset', (e: any) => console.warn('Cap reset:', e.detail))
})

const onSubmit = async () => {
  // const cap = new window.Cap({
  //   apiEndpoint: 'http://localhost:5075/api/captcha/form/',
  // })
  // cap.addEventListener('solve', (e) => console.log('成功:', e.detail.token))
  // cap.addEventListener('error', (e) => console.error('Cap错误:', e.detail))
  // try {
  //   const solution = await cap.solve()
  //   alert(solution.token)
  // } catch (e) {
  //   console.error('调用失败:', e)
  // }

  validate()
    .then(() => {
      console.log(toRaw(modelRef))
      data.spinning = true

      // 新建一个JSEncrypt对象
      const encryptor = new JSEncrypt()
      // 设置公钥 （这是后端直接给我的，看你们项目情况是需要调接口获得，还是程序中直接写死）
      const publicKey =
        'MIGfMA0GCSqGSIb3DQEBAQUAA4GNADCBiQKBgQDlOJu6TyygqxfWT7eLtGDwajtNFOb9I5XRb6khyfD1Yt3YiCgQWMNW649887VGJiGr/L5i2osbl8C9+WJTeucF+S76xFxdU6jE0NQ+Z+zEdhUTooNRaY5nZiu5PgDB0ED/ZKBUSLKL7eibMxZtMlUDHjm4gwQco1KRMDSmXSMkDwIDAQAB'

      encryptor.setPublicKey(publicKey) // publicKey为公钥
      // 加密数据
      const password = encryptor.encrypt(modelRef.password)

      jwtAuth({
        platform: import.meta.env.VITE_APP_NAME,
        username: modelRef.username,
        password: password.toString(),
        clientId: modelRef.clientId,
        captchaCode: modelRef.captchaCode,
      }).then((token) => {
        console.log(token)
        useAuthStore().setJsonWebToken(token)

        Promise.all([useAuthStore().getProfile(), useAuthStore().getBehavior()]).then((jsons) => {
          console.log(jsons)
          let path = defaultHomePath

          const { redirect } = route.query
          console.log('redirect', redirect)
          if (redirect && redirect !== '') {
            path = redirect + ''
          }

          router.replace({
            path: path,
          })
        })
      })
    })

    .catch((error: ValidateErrorEntity<LoginFormState>) => {
      console.log('error', error)
    })
  // .finally(() => { })
}

const data = reactive({
  spinning: false,
  verifyCodeLoading: false,
  disableSendButton: true,
  formattedCellPhone: '',
})

onMounted(() => {
  const widget = document.querySelector('#cap')

  widget?.addEventListener('solve', function (e) {
    console.log(e)

    // handle the token as needed
  })
})
</script>

<style lang="less">
cap-widget {
  --cap-background: transparent;
  --cap-border-color: transparent;
  --cap-border-radius: 14px;
  --cap-widget-height: 30px;
  --cap-widget-width: 200px;
  --cap-widget-padding: 14px;
  --cap-gap: 15px;
  --cap-color: #212121;
  --cap-checkbox-size: 25px;
  --cap-checkbox-border: 1px solid #aaaaaad1;
  --cap-checkbox-border-radius: 6px;
  --cap-checkbox-background: #fafafa91;
  --cap-checkbox-margin: 2px;
  --cap-font:
    AlibabaPuHuiTi, HYCuJianHeiJ, PingFangSC, HYZhongJianHeiJ, Georgia, Avenir, Helvetica,
    'BlinkMacSystemFont', '.SFNSText-Regular', 'San Francisco', 'Roboto', 'Segoe UI',
    'Helvetica Neue', 'Lucida Grande', 'Ubuntu', 'arial', sans-serif;
  --cap-spinner-color: #000;
  --cap-spinner-background-color: #eee;
  --cap-spinner-thickness: 5px;
  // --cap-checkmark: url('data:image/svg+xml,...);
  // --cap-error-cross: url('data:image/svg+xml,...');
}
</style>
```

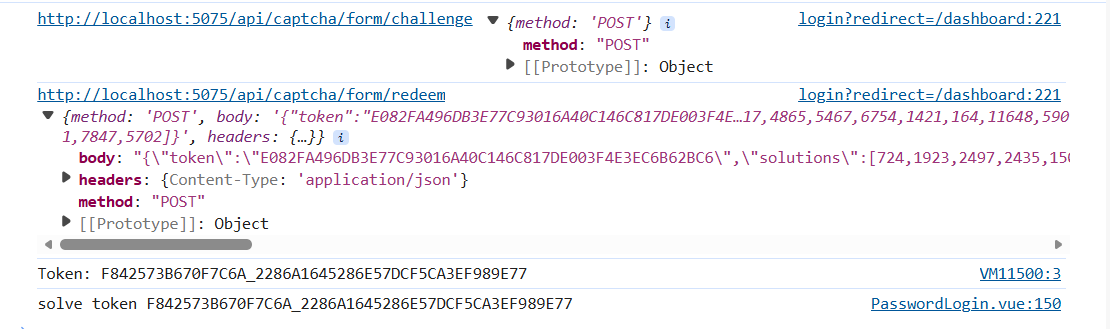
![效果预览](/images/QQ-20260206111410.png)

You can listen to the solve event to obtain the generated token and proceed with your form submission or API calls.

## 🧪 Validate the CAPTCHA Token in a Controller ##

To use the CAPTCHA token validation in a real-world scenario, you can inject ICaptchaService into any controller (e.g., a LoginController) and verify the token submitted by the client.

Example: Validate Token in LoginController

```cs
[ApiController]
[Route("[controller]")]
public class LoginController : ControllerBase
{
    private readonly ICaptchaService _captchaService;

    public LoginController(ICaptchaService captchaService)
    {
        _captchaService = captchaService;
    }

    [HttpPost]
    public async Task<IActionResult> Login([FromBody] LoginRequest request, CancellationToken ct = default)
    {
        if (string.IsNullOrEmpty(request.CaptchaToken))
        {
            return BadRequest("CAPTCHA token is required.");
        }

        var isValid = await _captchaService.ValidateCaptchaTokenAsync(request.CaptchaToken, ct);

        if (!isValid)
        {
            return BadRequest("Invalid or expired CAPTCHA token.");
        }

        // Proceed with login logic
        return Ok(new { message = "Login successful" });
    }
}

public class LoginRequest
{
    public string Username { get; set; }
    public string Password { get; set; }
    public string CaptchaToken { get; set; }
}
```

- The `ICaptchaService` is injected via constructor injection.
- The `ValidateCaptchaTokenAsync` method is used to verify the token submitted by the client.
- This helps prevent bot abuse on critical endpoints such as login, registration, or form submission.

## 📚 View Sample Project ##

Please check the `samples/WebApplication1` folder in the source code. It includes:

✅ A full ASP.NET Core web application integrated with PowCapServer
✅ Frontend usage with the `@cap.js/widget`
✅ Example controller usage for token validation